Monday, July 13, 2009

Improve Performance Of Your Windows XP

Have you always wanted to get more out of your machine. Wanna see how to boost system speed and in turn speed up your activity over your computer?? Look No further. This is no publicity for a spyware mounted software that i will ask you to install and pay me for it. Instead i will tell you some tweaks that you can try yourself and feel the difference.

  1. Disable Extra Startup Programs

    There are certain programs that Windows will start every time you boot up your system, and during the startup phase, they're all competing for a slice of your CPU speed. Extra or unwanted items in the startup list will definitely increase your startup time, perhaps by several minutes. Some common examples are things related to AOL, RealPlayer, Napster, instant messengers, and video managers If you're not sure about an item, no big deal. You can turn it off, restart your PC, and see if everything seems to work. If not, you can always go back and re-enable an item in the Startup list. Here are is what you have to do:
    1. Go to Start button  Run
    2. Type "msconfig", without quotations
    3. Hit enter key or click the OK button
    4. A System Configuration Utility window will show up
    5. Click the Startup tab
    6. In the Startup tab you will see several boxes and some of them will selected (checked). All you have to do is to uncheck extra items that are of no use. If you run an antivirus program it is not recommended to uncheck it.
    7. After making you choices press the OK button, you will be prompted to restart computer to apply changes.
    8. After restarting your computer a dialogue will be displayed. You can check the option for not showing this dialogue every time your PC reboots.

  2. Optimize Display Settings

    Windows XP can look sexy but displaying all the visual items can waste system resources. To optimize:
    1. Click the Start button
    2. Select Control Panel
    3. Double-click the System icon
    4. Click the Advanced tab
    5. In the Performance box click Settings
    6. Leave only the following ticked:
      1. Show shadows under menus
      2. Show shadows under mouse pointer
      3. Show translucent selection rectangle
      4. Use drop shadows for icons labels on the desktop
      5. Use visual styles on windows and buttons
    7. Finally, click Apply and OK

  3. Optimize Folder Switching And File Browsing

    You may have noticed that every time you open “My Computer” to browse folders that there is a slight delay. This is because Windows XP automatically searches for network files and printers every time you open Windows Explorer. To fix this and to increase browsing speed significantly:
    1. Double-click on My Computer
    2. Click the Tools menu
    3. Select Folder Options
    4. Click on the View tab.
    5. Uncheck the Automatically search for network folders and printers check box
    6. Click Apply
    7. Click OK
    8. Reboot your computer

  4. Disable File Indexing

    Indexing Services is a small little program that uses large amounts of memory and can often make a computer endlessly loud and noisy. This system process indexes and updates lists of all the files that are on your computer. It does this so that when you do a searc for something on your computer, it will search faster by scanning th index lists. If you don’t search your computer often, this system service is completely unnecessary. To disable do the following:
    1. Click Start button
    2. Select the Control Panel
    3. Double-click Add/Remove Programs
    4. Click the Add/Remove Window Components icon on the left side of the window
    5. This may take a few seconds to load. Be patient.
    6. Look for the “Indexing Services” component in the list
    7. Uncheck the Indexing Services
    8. Click Next
    9. Click Finish

  5. Remove Un-Used Programs & Files

    You may have a bunch of software packages on your hard drive that are no longer needed, or they were gratuitously installed when you downloaded some other package. Toolbars, file-sharing programs, free email enhancers, online shopping "companions" and download managers are notorious for this practice. These uninvited guests can put a big drag on your startup time, cause web pages to load slowly, and generally bog down your computer. Well we all know how do that... so i'll pass on that..

I hope that with these tweaks done you'll certainly feel your computer to be lighter and more responsive as ever. You will soon realize that its better to have more speed than the eye candy of the OS. HAPPY WORKING

Sunday, June 28, 2009

Cant Wait To Get My Hands On This Book

: The Rootkit Arsenal: Escape and Evasion in the Dark Corners of the System

  • Pages: 908 pages
  • Publisher: Jones & Bartlett Publishers (May 4, 2009)
  • Language: English
  • Fanatics Like Me : Click Here

Wednesday, June 3, 2009

Are you Smarter Than 5th grader

Wanna play the all famous game...... Here is the setup for the game that i built. Want a Preview.... Scroll here are the source files to it.

Java & Mysql Based Conference Client

I developed this conference client just for me in my free time.... v Hybrid architecture (Client Server and P2P) based Instant Messenger. v It has features like text messaging with text formatting inclusive of smiley, audio and video chat. v It has a Desktop Sharing feature wherein users can view/share their desktop among themselves. v It is cross platform as it is based on Java and it uses MySql as backend. It is dependent upon JMF (Java Media Framework) here is a video in which i demonstrate how to go about using my project. I have also included a log file. Please send me the log file in case you encounter any errors. Here are the executables.

Sunday, May 24, 2009

Java MS Access Primary and Foriegn Key

Here is my problem statement : To Implement these 4 functions 1.// return a list of all the table names in the database // as an ArrayList<string> which looks like: // [tableName1, tableName2, tableName3, ..., tableNameN]

ArrayList<string> getAllTableNames()

2. // return the primary key of a given table

// as an ArrayList<string> with the primary key columns in proper // order

ArrayList<string> getPrimaryKey(String tableName) OR PREFERABLY:

write a method to return all the primary keys of all the tables at once.

3. // for a given table, return a list of 4-tuples which are // the relational constraints from foreign tables into this // table's primary keys. Each 4-tuple looks like this: // [PKTABLE_NAME, PKCOLUMN_NAME, FKTABLE_NAME, FKCOLUMN_NAME]

public ArrayList<arraylist<string>> getTableConstraints(String tableName)

OR PREFERABLY:

write a method to return all the relational constraints of all the tables at once.

4.// return a list of all the columns in the database as // a list of triples. Each triple looks like this: // [TABLE_NAME, COLUMN_NAME, DATA_TYPE]

ArrayList<arraylist<string>> reallyGetColumns()

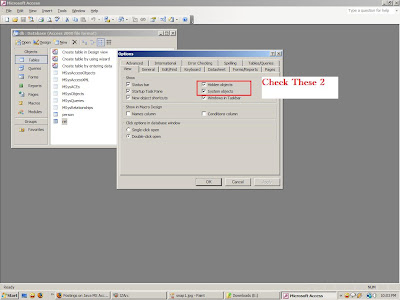
My PROPOSED SOLUTION: For getting the foreign key relationships you'll have to enable the read permission to system table via access (refer to screenshots). Next :

For getting the foreign key relationships you'll have to enable the read permission to system table vi access (refer to screenshots).

Here are the Function Prototypes that are called :

1. private ArrayList<string> gettablenames(Connection con) throws SQLException

2. private ArrayList<string> getprimarykey(Connection con,String tablename) throws SQLException

3. ArrayList<arraylist><string>> getforeignKeys(Connection con,String tablename) throws SQLException

4. ArrayList<arraylist><string>> reallyGetColumns(Connection con) throws SQLException

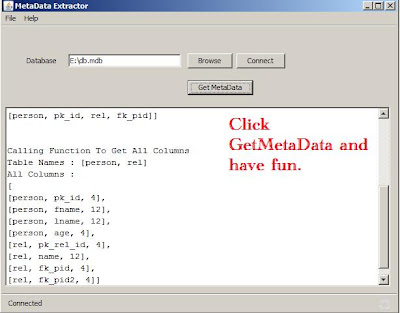
Test The application by double clicking the jar. I am also attaching the database that i used to test it.

Here is the Executable To Test. Get it Now (sample Db included). Here is the Source Code And Executable : NetBeans Project

: Eclipse Project

Websphere Application Server CE Support For RAD

Installing the WASCE WTP Server Adapter using the deployable.zip file Installing in Eclipse Europa

1. Visit the welcome page from the Eclipse Update Site for IBM WebSphere Application Server Community Edition (http:// download.boulder.ibm.com/ibmdl/pub/software/websphere/wasce/updates/). 2. Find the deployable.zip package and click the linkage to download it. 3. Make sure Eclipse is not running. 4. Extract this package to your Eclipse directory. 5. Use the Eclipse -clean option after installing the WTP server adapter.

copy as root to the /opt/IBM/SDP directory using type : cd plugins type : cp -r * /opt/IBM/SDP/plugins/ type : cd .. type : cd features type : cp -r * /opt/IBM/SDP/features/

NOTE : There should be no ommission of file error.

then use ./eclipse -clean to rerun RAD

Control Internet Connection Opensuse

Install the small package KINTERNET to control the connection (connect and disconnect from tray).

Install RAD

First install sun-jdk downloaded from here : http://java.sun.com/javase/downloads/index.jsp

NOTE : choose jdk update 13. use ./ to run the jdk setup.

to install rad extract all zips files. now open konsole.

navigate to RAD_SETUP folder. Type : cd .. Type : chmod -R u+x RAD_SETUP Type : cd RAD_SETUP Type : ./launchpad.sh

Thats it you have launched the gui for RAD setup . install with default.

Note : Disconnect internet before starting launchpad.sh

Peice Of Cake!! right

Enabling NTFS On OpenSUSE

http://en.opensuse.org/NTFS

OpenSUSE : For MP3 fans like me

http://opensuse-community.org/Restricted_Formats/11.0

go here install the codecs. just click on link and you will be fine.

DB2 Install on OpenSUSE

To install db2 : go to install software. (Start - > application - > system - > configuration -> install software.)

Put the opensuse dvd in drive and then search for libstdc++ . check libstdc++33 and click accept. it will install from cd in a sec.

then open Konsole (start -> applications) type in : su it will ask for password give it (123 if you created gennext as i told you) now keep the konsole running . Copy the db2 for linux tar file to your home directory (start -> computer -> home) now click on it to open with ark. extract its contents in home.

Now come back to the terminal .

Type : cd expc Type : ./db2setup and then the setup installer GUI will appear. and db2 will install fine.

Configuration Options for db2 :

DAS user : db2admin password : password do not change group or anything else. DB2 Instance Owner : User: work passowrd: 123 Default setting for fenced user. just type in password as 123.

FINISH log into work and then Now on konsole type db2start to start db2 and then db2cc to have the GUI front end like mysql query browser

MULTIBOOTING OPENSUSE 11.1 VISTA

OPENSUSE install

Prerequisite Create a 15 - 20 GB unallocated partition through windows disk management or any partition manager of your choice,

Install:

Installation is pretty straight forward. I prefer to use KDE 4.1 desktop environment. HARDDISK CONFIG : I went for expert config and suggest that you should. You will not see the unallocated space you created there. but dont worry it is usable. click add and create a 600 MB ext 3 partition with mount point /boot. Next Create a 2 GB swap partition and the remaining an ext3 with mount point "/". If you want to access the windows files via opensuse select each of your windows partition and select edit. Next confirm that it says "DO NOT FORMAT" and set its mount point to / mnt/drive_C. the mount point will change as the number of drives are increased. BOOTLOADER CONFIG : when you finish giving all your inputs it displays an anallysis of taks. Select bootloader. switch to bootloader config there. select only 2 options. 1. install bootloader to boot partition 2. install bootloader to MBR

You are done......

Sunday, January 11, 2009

Eagle Eye (2008) Download Torrent

Shooter 2007 Movie

Must watch Movie : Shooter (2007) Torrent : Shooter aXXo

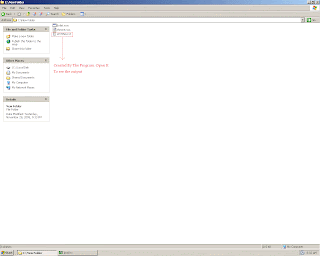
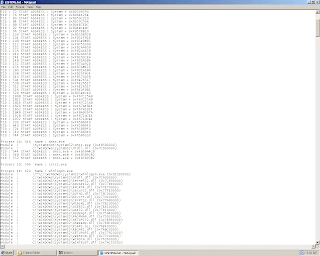
System Process, Thread And Module Information Extractor

There are often cases when some unwanted program (mostly spyware and worms) try to hide their activity by hiding themselves using kernel level techniques. So, to uncover these processes/modules/threads we have a driver which is compiled with Microsoft Windows DDK. The Driver is compatible with windows xp sp2 and sp3. Downloads Section The Driver(Zip File) So what we have to do is just run the InstDrv.exe (bundled along in the zip file). As With all the drivers we have to install my driver(TheOne.sys). To Do This Start Install Drv by double clicking on it. Type in the path to TheOne.sys and click Install. And when it says Operation Successfull click on Start to Start Our Driver Ok .. So we have Our Driver Up And Running.... To Interface With the driver we also have a Usermode Program (Enlist.exe Bundled In Zip) in Microsoft Visual C++. Run it to get the results from our driver. We get the following message on running it. Now the output on the console will not be desirable so enlist.exe outputs the results to a LISTING.txt File created in the working directory. Lets See What have we got in our LISTING.txt As You can see that this also gives you the base address of the module loaded so if you are viewing memory its easy for you to locate them... HOPE THIS HELPS....